Tutorial - step 6: modify application to post URL parameters
Introduction
This last step demonstrate use of URL parameters in actions.
Struts 2 uses "params" interceptor to dynamically store URL parameters in action bean properties. MVC Web Project enables to add interceptor-ref tags in each struts2 action.
To demonstrate use of URL parameters, we add a new view in hello world. This view is names Bye bye cruel world.
Then, hello world action will load a "view" parameter, and either display hello world view, or bye bye view.
Changing existing nodes
Enter Hello World package. Select link between Hello World action and Hello World view.

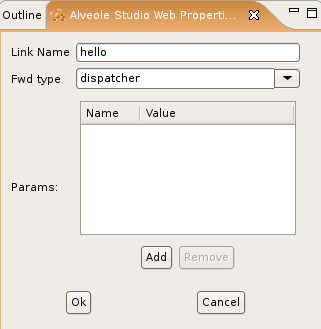
Then rename this link as "hello":

Now open Hello World action (double click on action node). In action class, add an attribute named "view", of type string. Add the getters an setters.
        private String view;

        public String getView() {
                return view;
        }

        public void setView(String view) {
                this.view = view;
        }
Then in hello() method, return getView() instead of "success":
        /**
         * Struts action implementation for node Hello World action
         * @return a link to follow
         */
        public String hello() {
            return getView();
        }
As a result, action will result the mapping that was posted in view attribute of the calling URL.
To map parameters, struts2 need to add the "params" interceptor.
Select hello world action node.

In the action parameters view, click the open button. A complete editor tab is opened in graph editor:

In interceptor panel, enter "params" in field "name". Then click the "Add" button at the bottom of the pannel. A new interceptor reference is then added to the list of interceptors of this action.
Save project and click on the close button.

Go back to tree tab in graph editor:

Editing JSP files
Open init.jsp file and replace body content with the following:
Initialization page ! Choose hello or bye:<br/>

<a href="<s:url link="next"><s:param name="view">hello</s:param></s:url>">Go to hello world</a><br/>
<a href="<s:url link="next"><s:param name="view">bye</s:param></s:url>">Go to bye bye cruel world !</a>
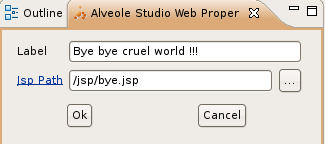
Create a new JSP view in Hello World package, and call it bye.jsp:

In the target JSP file, set following contents:
<%@ page language="java" contentType="text/html; charset=UTF-8"
    pageEncoding="UTF-8"%>
<%@ taglib uri="/alveole-struts2" prefix="s" %>
<!DOCTYPE html PUBLIC "-//W3C//DTD HTML 4.01 Transitional//EN" "http://www.w3.org/TR/html4/loose.dtd">
<html>
<head>
<meta http-equiv="Content-Type" content="text/html; charset=UTF-8">
<title>Insert title here</title>
</head>
<body>
Bye bye cruel world !<br/>

 <a href="<s:url link="next"/>">Go to close session</a>
</body>
</html>
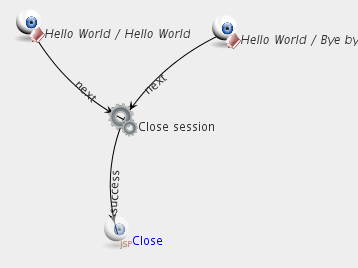
Then create a link from Hello World action to Bye view, and name it "bye". Create a link from Bye view to close package.

At last, goto close package, and create link from Bye view to close action, and name it "next".

Testing
Run the modified application on your application server. Open URL:
http://localhost:8080/HelloWorld/index.action
Then choose one of the two links:

If you choose the hello link, a hello world page is displayed, as in first version of our application. If you choose the bye link:

Conclusion
Sources of this tutorial are available for download
. If you experience some difficulty, post your questions on sourceforge forum
.


